

Not sure how to foam Cleanser 1? Read this. | Skin Secrets
Table of Contents
NGL, we surprisingly derive gratification viewing Cleanser 1’s pink gel texture change into a luxuriously loaded dense foam.

The bouncy lather feels so comforting when massaged on the skin, creating the cleansing system seriously therapeutic.

The abundant foam is crucial for trapping and eradicating filth and impurities on our pores and skin for a complete cleanse.
With its special gel-to-foam texture, new end users may possibly need to have some time or a very little assist at the start out to ideal the foaming process.
How to foam Cleanser 1: 6 do’s and don’ts
Underneath are a couple strategies and methods on how to foam Cleanser 1 that’ll make sure you convert that pink gel into a loaded foam each individual time! #AchievementUnlocked
Do’s
1. Squeeze the gel cleanser in the middle of your palm
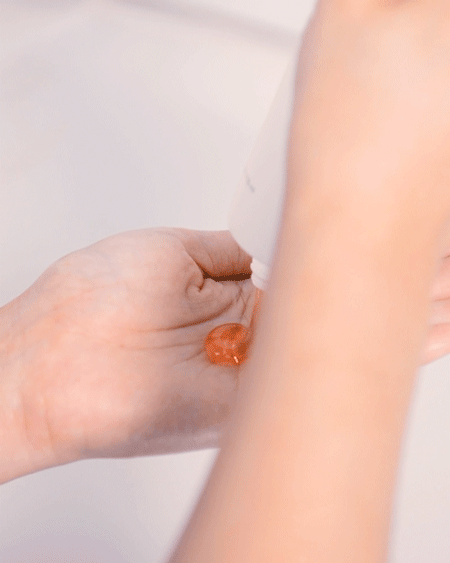
Squeeze Cleanser 1 in the centre of your palm as an alternative of your fingertips or all over your hand. This provides you a lot more floor location to emulsify the products, which helps make it easier to generate foam.
Idea: Spread and emulsify until compact bubbles surface

Unfold the cleanser throughout your palms a small immediately after incorporating small amounts of drinking water. Emulsify till it turns white.
2. Increase tiny amounts of drinking water in intervals and “whisk”

Lather by adding tiny amounts of water. Sweep across your palm with mild round strokes. This aids to introduce additional air, which enables the cleanser to foam up speedily. Whisk for a couple of seconds ahead of including compact quantities of water and repeat.
3. Consistently scoop up the foam and any remaining pink gel on your hand and place them in the center of your palm through the foaming course of action

The whisking motion will inevitably trigger the foam and any remaining pink gel to settle close to your arms. Consistently scoop them to the middle of your palm and be certain none of the gel is sticking to your arms so that all the item is being used.
Keep sweeping in a round movement repeatedly. This will aid to raise the volume and density of the foam generated.
Don’ts
4. Really don’t neglect to wash your palms with soap

Clean palms will support you lather up Cleanser 1 very easily. It is usually important to clean your fingers with cleaning soap just before cleansing to reduce any grime or dust from coming into call with your experience.
5. Never increase much too a lot water to the foam

Introducing also much drinking water to the foam could wash the foam away, ruining all your effort!
6. Never rub the two palms collectively

Do not rub equally palms in opposition to each other or exert much too substantially pressure. The cleanser will not be capable to foam up this way.
Do’s and don’ts infographic
Here’s a rapid infographic you can help save and refer to whilst foaming Cleanser 1!

There is no “one suitable way”
Although the strategies above will help, there really is no “one suitable way” to do it! Each individual consumer has his/her own special way of foaming up Cleanser 1. Some may even prefer using a foam maker (make certain your foam maker is very well-cleansed if you decide on to do so this way!). The objective is to get the abundant dense foam responsible for productive cleaning.

If you’re in question or want much more strategies and tricks to help you grasp the appropriate method, come to feel free to technique your Pores and skin Buddy for help.
Have a suggestion on how to foam Cleanser 1? Remark down down below!